Thursday, December 15, 2011

Comfy, Cozy Christmas Robe


What is yummier than a soft, flannel robe? I've had Butterick 3655 forever and have made several short spa length robes but not a full length one. I envisioned a soft buttery cream color with a plaid cut on the diagonal for the shawl collar and cuffs. Nothing is more frustrating than going to the fabric store with a the perfect creation in your head and then not being able to find the exact fabric. A Christmas angel was on my shoulder! The bolts of flannel practically attacked me as I wandered down the aisle.

Since the flannels were of different weight I washed and dried them both before cutting out. Softer and yummier than ever, I laid out my pattern and cut away. I did take some care matching the plaid, especially on the collar. Inasmuch as this was not an even plaid I cut the collars with a single layer of fabric. I placed the pattern, cut one piece, then turned that piece over, laid it on the fabric and matched the plaid of the cut piece to the remaining fabric. Easy peasy. I did buy a little extra fabric for matching. The cuffs I wasn't as careful with and they look fine.

Three things the pattern doesn't tell you to do so I will tell you. After pressing the shawl collar I topstitched around the edge to give it a finished look and also to keep it from rolling after I wash it. Shown here:


Another thing I did was to sew the facing down from the shoulder all the way to the hem. It's a wide facing and if it isn't sewn down it's just this flapping thing you will always be fiddling with. I had it flapping around on one of the short spa robes I made and one day said "Why am I always fiddling with this thing? Sew the damn thing down." It made all the difference in the world! Here is approximately where I'm talking about:


Lastly, I cut 4 plaid cuffs instead of two. That way there was a nicely finished side when the cuff is rolled up with plaid on both sides.

Here's the pattern...I'm not sure it's still in print but I'm sure there are others that are the exact same robe...it's a very classic style:


I will be making an exact replica of this robe. My sister saw it and wants one for Christmas. Let's see, today is December 15th...no problem!

Saturday, November 26, 2011

A Perfect Pair of Pants!


My first advice is not to make a pair of pants the weekend after Thanksgiving! What was I thinking? That last piece of pie shows clearly in the side view...


You are looking at cornbread dressing and pecan pie...

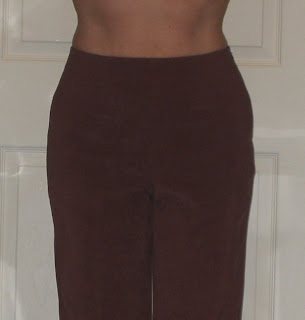
I discovered McCall's 5239 which is a Palmer/Pletsch Classic Fit pattern chocked full of great instructions for achieving a good fit. If you've never tried their fitting method I believe it is the best. For these pants I sewed View A with a few changes. I am not a fan of waistbands and all the views on this pattern have one. In fact, patterns seem to go from waistbands to elastic with not much in between. Depending on the fabric I would line them but the wrong side of this moleskin was really nice and soft so I cut facings for the waist. I did this by first pinning the darts in place:


And then using the shape of the waist to cut pieces about 2-1/2" deep and longer on each end:


I make notes on the facings so I have whatever option I want to when placing my zipper. On this pair I wanted a side zip so I cut both back and front facings on the fold. Here is the finished facing:


I had some questions from PR friends about how the pants would sit at the waist once the waistband is eliminated. I guess everyone has their preference about where their actual waist is; and how they like clothes to look and feel at the waist, for me the scenario below is perfect. I don't want anything around what appears to be my "real" waist...that feels too high to me:


And along these same lines, another thing I hate is the hook & eye process. As far as I'm concerned they are just annoying little stabbers waiting for you to lean against them and wince in pain! I've eliminated them completely at the top of my zips by sewing my facings or linings flush with the top of the zipper like so:


I think the true test of a pair of pants is how they look from the back and I think these look pretty darn good compared with other RTW in my closet.


This is rather brave of me, I think...

I will definitely use this pattern as my sloper now and a TNT for a great fitting pair of pants. So, not only am I'm hitting the grocery store tomorrow for a healthy basket I will be on the elliptical tomorrow afternoon!

Friday, November 25, 2011

New sewing tool...the Texas Curve


Well, I'm at it one more time with Vogue 1261. I wanted to make View A with the scoop neck out of a really great knit embellished with a glittery gold ornament looking design on it...not your typical Christmas colors but great holiday colors for an autumn toned complexion like mine...and the gift? It was a half price remnant at High Fashion so I had to make it mine.  

So...I've made this top twice before and knew I needed to further perfect the fit at the waist. Being rather full busted, tops that are cut straight down without some contour in the waist tend to make me look rather dumpy...which translates to frumpy!

Somehow, in my move from Atlanta back to Houston, I have yet to uncover my French curve so I put my thinking cap on. Brainstorm: I made 2 ovals in Microsoft Publisher in the general size and shape I wanted to nip at the waist. I cut them out and placed them according to previous measurements and basically went from the Medium at the bust and hips down to the Extra-small only at the waist:


I drew the curve onto the pattern with a red Sharpie and then taped all along the outside of the curve. Then I cut several slices into the curve so I could easily fold the pieces back to cut my fabric:


It worked great and gave me just the bit of definition that I needed to slim out the look of this tunic. I've decided to call my new invention the Texas Curve. Try it! It worked great!

Tuesday, November 22, 2011

Vogue 1261: Alice + Olivia Tunic = Awesome


I zipped up two of these tops in no time. Adorable pattern. Buy it. Then save yourself...throw away the instructions before you do anything else! Forget all the paper and tape and ribbon for making seams. Who has time for that nonsense making some artsy seam? Cut both the front and back on the fold and get on down the road!

Another change I made was the on the neckline and the cowl. I cut the shirt out in a medium except for the neckline which I cut along the extra small size which enlarged the neckline about 1". The pattern has it a single layer cowl where the wrong side will show when laying at the neckline. Why? I widened the cowl about an inch to accommodate the larger neckline and then I lengthened the cowl about 2-1/2" and folded it in half before serging to the neckline. That way there is no wrong side of my fabric showing. I made both of these in a Medium and did not need my usual FBA. I also nipped a little bit in at the waist so it didn't look so sacky on me.

Monday, November 21, 2011

Thanksgiving Day Tunic


Inasmuch as we are putting the dressing together the day before I won't worry about getting the multitudinous ruching of these sleeves in with the cornbread dressing! This is a great Sandra Betzina Vogue (V1197) that was purchased solely with this awesome knit in mind that I bought from Vogue Fabric's booth at the International Quilt Festival earlier this month. It is the heaviest, most wonderfully drapey knit (I don't even know or care what the content is!) with a crosswise stripe that only concerned me for a moment; once I saw this great tunic pattern I knew it was made for my fabric!


This pattern had a really goofy J-shaped sleeve that only made sense once the elastic was sewed on it to create the ruching. I still don't know the reason for the J shape but it works when you wear it so... inquiring minds may not need to know this answer. But...take a look at this weird sleeve pattern:


One change I made, simply because I did not have enough fabric, was to only cut one cowl as opposed to two like the pattern suggests. Since the weight of my fabric was so heavy anyway, it worked out for the best. I simply folded the 1 cowl in half and serged to the neckline. I think a double layer of fabric on the cowl, with this fabric, would have been too heavy:


Love, love, LOVE it...will I make it again? ...probably. I'm a big believer of sticking with what I know and love.

To all of my PR, blogging and sewing friends: May you all have a blessed Thanksgiving filled with peace, love, good food, good times and gratitude for the community that brings all of us together...much love....dorcas

Sunday, November 13, 2011

The Great Sleeve Experiment


I love McCall's 5752 which is one of Palmer/Pletsch's "Perfect Knit Dress" patterns. I think it is being phased out, if not actually out of print, since I couldn't find it in the stores and had to order it from McCall's. Or you might check the PP website at http://palmerpletsch.com. They are great about answering promptly.

So on this pattern views A&B have a shawl collar, wrapped bodice and capped sleeves. Views C&D have a deeper V necked wrapped bodice with long, set-in sleeves. I wanted version B with long sleeves. What to do? Change the wrapped bodice on version C to the shawl collar or add sleeves to version B? I choose to add sleeves to view B then and shorten it to tunic length and had pretty good results. Here is the pattern envelope:


I wanted the view on the left but with long sleeves!

To make the sleeve I simply placed the front and back pattern pieces together at the shoulder seam and drafted that shape for the top of the sleeve then used the sleeve from my sloper for the right length. I ended up with:

You can see a faint line down the sleeve indicating the
shoulder and notice the front "half" is narrower than the back.
I then decided the sleeves needed a little oomph so I marked 8" on each side of the sleeve at the wrist and sewed clear elastic, stretching as I sewed, to create some gathering. Here is a close up of that:


This is also a great pattern where the ruching in back view tends to fool the eye a bit! What woman wouldn't count that as a bonus!


I did my usual FBA and then the only other change I made to this pattern was to leave out the second waist stay in both front and back. When the gathered waist pieces were basted to the stays there was already more thickness in those areas than I wanted. I simply sewed wrong sides together of the gathered pieces and stays so that the right side of the stay shows inside my garment. I was happy with the changes that I made to this pattern and the end result. As usual, another winner for Pati Palmer!

Sunday, October 23, 2011

New Look 6000...Channeling June Cleaver


I love this pattern! It's so retro...put on some pearls and you'll feel like baking cookies for Wally and the Beav... I wanted to sew View C with the tucks at the waist, but because I used a plaid woven rayon I decided to sew View E (yellow with polka dots on the pattern envelope) and add the collar.


Since this was such a cute plaid I decided to cut the cuffs on the bias like the collar. I think they would have been rather boring cut on the straight of grain. If you happen to choose a plaid for this pattern, don't take the time to match the plaid on the bias collar the way I did...I swear, sometimes my anal-retentativeness takes a lot of the fun out of sewing! The button selection was touch and go and after thinking I'd never find the perfect ones for the retro look I was going for they appeared.


I did my usual FBA, used an invisible zipper and lace at the hem. FYI after the FBA I ended up needing to take in the front vertical darts from the middle of the darts up towards the bust to achieve a more fitted look. Here is another view of the front:


The pattern instructs for a back vent rather than just a slit which is a nice detail. I recommend this pattern for a fun twist on a fitted sheath!


Friday, October 14, 2011

Can A Girl Have Too Many LBD's?


I think not! And now I also have a new TNT! McCall's 2401 fitted sheath is just that...a fabulous must have wardrobe builder. What a classic! I'm not sure how old or new this pattern is but I am certainly excited to add it to my arsenal as a tried and true "go to". This first go round I made view A with longs sleeves and a V neck. I used a Ponte Roma knit that was oh so yummy to work with. Altering for an FBA was easy peasy with this straightforward design.  I used my new Super Duper Sloper that I recently made using McCall's 2718 fitting shell pattern, hereinafter referred to as my SDS, for a glove like fit. (See my SDS next to the dress pattern below.) I cut, inserted an invisible zip, basted seams then serged. Voila...instant gratification from 2 yards of fabric! What's not to like?


My "laminated" sloper is on the right. Making the FBA on McCalls's 2401 was
much easier using my sloper for fitting measurements and comparisons.

I will make this pattern over and over again. How basic can you get? Imagine all the possibilities afforded in this one little envelope! I would imagine that I will ultimately "laminate" it with lightweight fusible interfacing like I did on my SDS. With the exception of Burda Style magazine I'm not much of a pattern tracer (boring and a not fun timewaster step in my opinion) so when I have a TNT it gets a lot of wear and tear. The laminating makes it last forever:


I ironed a lightweight fusible interfacing to my finished sloper pattern to add stability.

One change I do intend to make is to this dress is to undo the slit in the back and turn it into a vent. I just think it will take take the "classy" factor up a notch, a necessity since I'm wearing more fabulous jewelry from the Jodie Bell estate! If you don't have this pattern in your stash, get it!

Sunday, October 2, 2011

Making a Sloper with McCall's 2718 Fitting Shell


It will be hard for anyone except me to appreciate the beauty of this project! But all of us who love to sew travel the never-ending road in search of the perfect fitting garment. Our weight fluctuates, we age, styles change, we fall in and out of love with our bodies and want to show off or camouflage them accordingly...all of these things come into play when it comes to fit. I've been studying Fit for Real People by Pati Palmer and Marta Alto and think it is the best approach for getting a great fit. I embarked upon the odyssey by purchasing the pattern they recommend to make a fitting shell from McCall's 2718, and followed both the book and the pattern directions to make my fitting shell and construct my sloper.

As they point out, very seldom, if ever, will we wear a garment as close-fitting as the fitting shell. It is virtually like a second skin, with a minimum of ease built in. Based on my upper bust measurement I used a size 12 pattern and modified as needed. The pattern comes with 5 different cup sizes for the bodice from A to DD. I needed the latter. The patterns that we purchase are based on a B cup size. I don't even think I had a B cup at birth...

Aside from grading the waist and hips out, the most significant things I learned from this process were that I need both a wide back adjustment as well as an erect back adjustment. The process is incredibly interesting as adjustments become noticeable based on the wrinkles formed.


The erect back adjustment can be seen as the horizontal tuck above the bodice darts.
Without the tuck a wrinkle formed there...very interesting discovery!

The pattern is first "tissue fitted" which is preparing the pattern with tape and pins and then it is literally "tried on" to see how we vary from the basic pattern size. After making paper adjustments a shell is cut from 1/4" gingham. Further fitting is done on the shell and then markings are transferred back to the paper pattern. This amended paper pattern is your body's "roadmap" and becomes a sloper that can then be compared to any fashion pattern taking the guesswork out of your sewing projects.  

The premise of this exercise is that skirt + bodice = dress. The skirt is easy enough to fit on your own but you will really need to enlist a friends help with the bodice. I didn't require any further alteration to the bodice front other than the cup size. Below is a picture of the bodice back showing the 1/2" broad back adjustment that I will make as well as the marking for the erect back adjustment.


The broad back adjustment is the vertical pleat marked with red dashes. The erect back adjustment is the horizontal red mark at the top of the back dart. It begins as a 1/4" pleat and tapers off to nothing toward the arm.

As Pati and Marta point out, depending on the amount of ease that your planned garment allows, some, none or all of the adjustments on your sloper will be used. Once you have made this ultra-close fitting shell from your sloper, anything with more ease will be a breeze. When complete I intend to bond fusible interfacing to my sloper so I will have a permanent pattern showing how my body differs from the standard patterns of the Big 4. I highly recommend this process as a way to get to know your body's roadmap and have more great fitting garments! 

Tuesday, September 20, 2011

So long Vogue 1250...


I'm not saying I will never sew this pattern again...no, I would never put that restriction on myself! I love V1250...it's just getting the lions share of my attention, not to mention space on my blog, and the other patterns are starting to grumble. So many great patterns...so little time. What's a girl to do?

I needed a new LBD for a birthday party and whipped up this little number in a yummy rayon knit. I've decided that the fit of this dress is completely dependent on the fabric used. This is the first one I've made with a rayon knit and the bodice finally has that drapey effect below the cowl (hard to see on black but it's there) like the one on the pattern envelope shown below.


The fabulous jewelry is courtesy of the Jodie Bell estate, undoubtedly the most incredible collection of jewelry west of the Mississippi. Jodie's daughter is a BFF of mine and has generously gifted me with many of Jodie's things. I wear them proudly knowing Jodie would be pleased. Take a look at the necklace up close...I had never seen anything like it:


The accolades I received on PatternReview.com about this dress overwhelming indicate that I need just one more V1250...a LBD with sleeves like I made on the yummy cinnamon crinkle knit version!

Tuesday, August 30, 2011

"Falling" for Vogue 1250


Inasmuch as I have lost count of the number of weeks Houston has had temps over 100 degrees one would think that whining about Vogue 1250 not having a long sleeved version would beg the question "what is she smoking?" And yet, preparing for that first crisp, cool day sometime in October was the inspiration for this project: I want V1250 with sleeves! It has bothered me from the get-go that sleeves were not an option.

This cinnamon colored "Crinkle Polyester" knit was actually the muslin I first made for V1250 and I loved the pattern so much I moved on to make others and put this one aside unfinished. I just love the color of this fabric and yet it has always said "Fall" to me so I decided it was the perfect Muslin #2 to try out the long sleeves on!

The first thing I did was to decide if I simply wanted to extend the existing cap sleeve or re-draft a set in sleeve at the shoulder. I took the easy route since I like the look of the existing dropped shoulder cap. I went through my stash looking for a pattern that had a similar cap sleeve and that also included a long sleeved version...I decided upon Butterick 5495. 


Next, I compared the two garments I had from each of these patterns. The armscye was virtually the same on both when I layed one upon the other:


Now, I must warn any of you who are professional pattern drafters, engineers, or basically anyone who has a highly functioning left brain...what I am about to do to get from A to B might be painful for you to witness...but, hey...it worked!

I took the back pattern piece with the extended sleeve from the McCall's pattern. On top of that I put the back pattern piece from V1250 and matched up the notches at the shoulder. No magic in that formula...it just happened to look right. I placed a piece of waxed paper over the sleeve to trace on. (sorry about the glare)


M5495 by itself

With V1250 back and notches matched, draw sleeve of M5495 on to waxed paper
 Then I repeated the procedure using the front of V1250, again matching the shoulder notches. See below:


Now I had a front sleeve and a back sleeve. Being the Einstein that I am, it occurred to me that I did not want a seam going down the top of my sleeve. So I turned one sleeve over and layed them sided by side, creating a whole sleeve. A further light bulb moment alerted me to overlap these two pieces to allow for imaginary seam allowances. I think I allowed too much which will be revealed by a fix later on.


Here are the two pieces of the sleeve side by side with approximately 1.250" overlapping (5/8 X 2 although this turned out to be too much. Plain old 5/8 would have worked better.)

So, I cut out the sleeve and pin fit it to my arm and the garment. It was a little snug but it seemed to fit the dress so I was going to trust the fabric I was using to be stretchy enough:


The next step required me to put on my big girl pants because it was time to cut into my fabric. Luckily, this "Crinkle Polyester" was on the remnant table so if it was a total disaster at least it was not a financial setback. Upon laying out my cute little pattern I saw that there was negligible difference between the front and back of it so I just folded that puppy in half and placed it on the fold. I ended up with a sleeve that looked like this:


Before cutting the second sleeve I basted in the first one. I undid a little of the side seam of the dress, sewed the sleeve in flat and then re-sewed the side seam and down the sleeve. It could have used a little more room right under the arm so I would make that adjustment on the other sleeve. It is not uncomfortable and not bothersome enough to buy more fabric and cut another sleeve. One down...one to go:


I decided to tweak the pattern a little bit and add a little more length to the under arm so I ended up with this:


And a cut sleeve that looked like this which fit much better with the dress:


So, as the heat continues to bake and buckle our streets causing the water mains to burst I shall continue my quest for a cute Fall wardrobe that will now include V1250 with sleeves! Hope this tutorial has been an inspiration for you to try something new! Happy sewing...and stay cool...